The Masterbuilt Gravity Series is a true revolution in the outdoor cooking market. It’s the first widely available charcoal fueled gravity fed cooking system that features grill, griddle and smoking options.
When I first encountered the Gravity Series 560, it was being used to cook some NY Strip steaks at 700 degree heat, achieving a stellar sear on the outside. Once I saw it in action, I knew I wanted to put one to the test.
Fast forward about 8 months, and we have hands on with a Masterbuilt Gravity Series 800 here at The Barbecue Lab. We’ve been able to put this unit through the ringer over the past 6 weeks, and what follows is the tale of our time together.
Note: Some of the links in this article may be affiliate links. This doesn’t cost you any more than normal. Read our disclaimer for more info.
Product Information:
Feature | Measurement |
|---|---|
Cooking Area | 800 sq. in |
Temperature Range | 225° - 700° F |
Assembled Dimensions | W55.1" x H50.9" x L30.5" |
Hopper Capacity | 10lbs lump/16lbs briquettes |
Shipping:
Once the order was placed, it took about a week for the grill to arrive. Delivery was made in the back of a full size van, and two ladies hefted it out and on to a dolly cart to bring it up the driveway and into the garage. Most grills arrive on a box truck with a liftgate, so this was a bit of a surprise for us, but we’re guessing that holiday deliveries being as hectic as they were this year that everyone was doing all they could to get packages out any way possible.
That being said, the unit arrived in a clean box without any visible dents or crush points, which isn’t something I can say for every unit that arrives here at the Lab.
Packaging:
The packaging on the Masterbuilt Gravity Series 800 was robust. I could see how multiple boxes could easily be stacked in the warehouse due to the amount of reinforcement that was present surrounding the unit.
As we were unpacking the cooker, we noticed that the gravity chute had a decent dent in the front that we were surprised to see. There wasn’t any kind of indentation or cut in the packaging, so our assumption is that this happened somewhere along the line in the factory and somehow made it into a box without anyone noticing.

I’m sure if we contacted Masterbuilt about it, they’d offer to make it right, but the dent is in a panel that doesn’t affect the functionality of the grill, so we decided to proceed and put it together.
Assembly:
Assembling the Masterbuilt Gravity Series 800 took about 90-120 minutes with the occasional “here, hold this please” assist from the missus. There are some screws that need to be put in this grill during assembly that could easily use two people, so consider having someone on hand to assist when you’re ready to put yours together.
The main body of the 800 and the gravity chute come pre-attached, so most of the assembly work comes in the form of building the cart, shelves and other paraphernalia. Like most grills that you can purchase at a big box store these days, there are pieces that come “pre-greased” that can make quite a mess, so plan accordingly.
How to Season Your Masterbuilt Gravity Series 800:
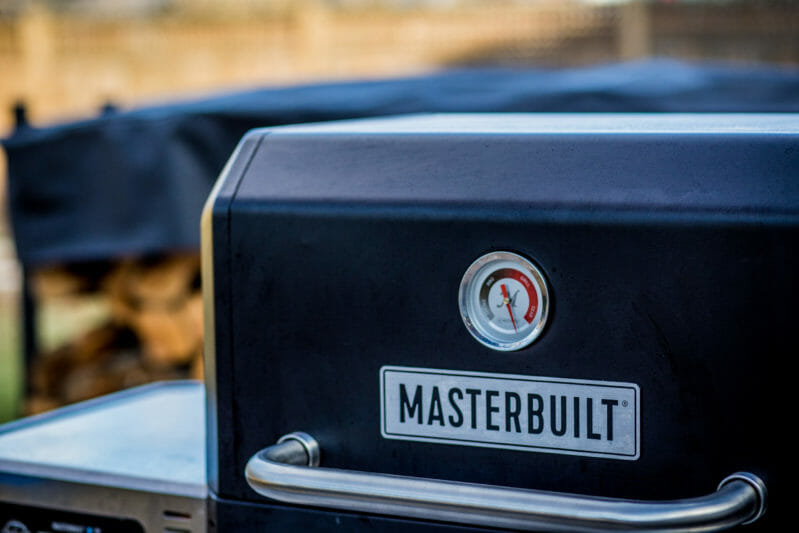
Masterbuilt supplies detailed instructions on how to season the Gravity 800 in the provided instruction manual, and you should follow them. It’s difficult to wait to get that first cook going while seasoning the grill for a couple of hours, but it’s important to burn off the oils and chemicals that are on the metal throughout the smoker before you put anything you want to eat inside.
The process is pretty simple.
- 1Start the grill and heat at 120°C/250°F for 60 minutes
- 2Kick up the temperature to 205°C/400°F for 30 minutes
- 3Shutdown & completely cool the unit
- 4Cover the internal surfaces of the cooking chamber with a cooking oil like Canola. We like to buy a spray bottle or two of cooking spray to make things easier.
- 5Start the grill and heat to 175°C/350°F for 30 minutes
- 6Completely cool and you’re ready to go
So, why would you want to go through all of the trouble to season it the right way? It’s simply the best way to combat rust on your grill. We do this on every grill that we have here at The Barbecue Lab, and it keeps rust at bay.
How to Season Your Masterbuilt Gravity Series 800 Griddle:
Seasoning the grill itself is different than seasoning the griddle attachment, but that process is pretty simple. You can find a video of how to season your griddle on our YouTube channel here.
We started by removing the grilling manifold, and putting the griddle manifold in place. After placing the griddle on the cooking surface, we fired up the grill to 260°C/500°F and let things get warmed up.
One the griddle was up to temperature, we applied a light coating of cooking oil to the surface and rubbed it in with a rag towel. As soon as we added the oil, the top began to smoke, and this is what we were looking for. The oil cooks into the griddle surface and helps it to season and take on the non-stick coating griddle cooks know and love.
We’d wait for the oil that was visible on the top to burn off, and as the top started to look dry again we would repeat the process. On this particular model, we applied oil 4-5 times over a period of about an hour before we felt that the top was ready to cook on.
As soon as we were satisfied with the seasoning of the top, we dove into our first cook by throwing down a rasher of bacon to give the top some flavor to absorb. If there’s a better way to season a griddle than using bacon, I haven’t found it.
Safety Features
The grill has quite a few built in safety features. The first is a lid switch, limits temp to 500°F/260°C when opened. This means that as long as you have the top open, 500°F is as hot as your grill or griddle will run. This is especially important when using the griddle as you’ll most likely have the lid open the entire time when using it.

The lid switch can be seen on the front right corner of the grill.
Hopper switches can be found on both the top of the charcoal hopper and the ash door to keep the chimney effect in check. Without these switches, the entire column of charcoal could easily ignite with a fan blowing hot air into what then becomes a charcoal chimney. Masterbuilt knows this, and when either door is opened, the fan stops to protect your grill and your cook.

A hopper switch located on the front right corner of the charcoal hopper.

The ash door switch located on the bottom left corner of the ash door.
Grilling:
The Masterbuilt Gravity Series 800 Series is quite a beast when it comes to grilling at high heat. If you’ve ever grilled over a charcoal fire, you know how hot the coals can get if you want them to, and this grill has a fan that stokes the coals to get them piping hot.

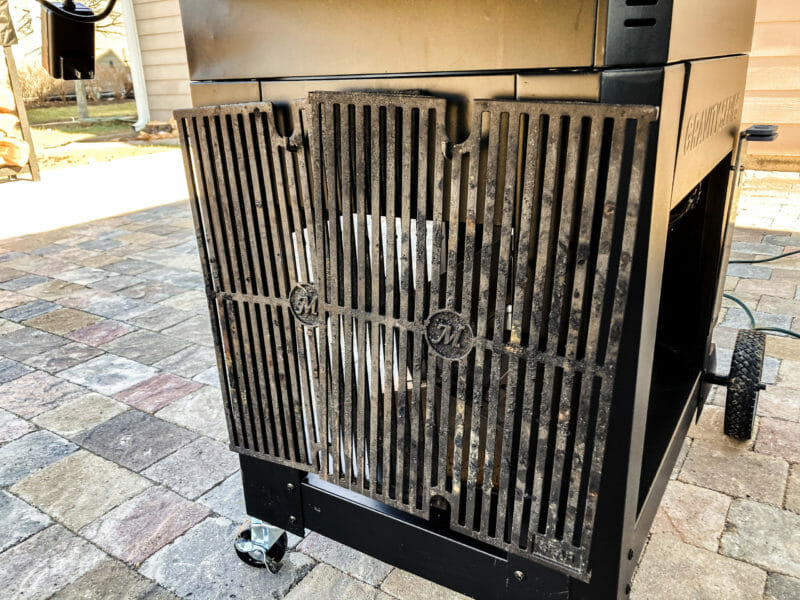
We grilled a Porterhouse steak as the first high heat test, and the grill marks from the factory grill grates were stellar. The grates are reversible on the Masterbuilt Gravity Series 800, with one side marked for smoke and the other for sear.

The grilling (sear) side has wide grill supports to make sure there’s plenty of coverage for great marks. We also grilled some Snow Crab for Christmas dinner, and the unit infused them with a great smokey flavor that you can’t get in a boiling pot of water.

A 700 maximum for high heat grilling is no slouch, as most grills available at big box stores won’t even come close to this high of a heat setting for searing. That’s one of the things that I’m a huge fan of with this unit.
How to Change from Grill to Griddle:
To change the 800 over from grilling to griddle mode, you just take off the grill grates to access the manifold below.

Griddle manifold

Grilling manifold
There’s a manifold for grilling and a manifold for the griddle, and whichever one isn’t in use has a perfect storage spot on the shelf below the unit.

Simply take off the grill manifold and replace it with the griddle manifold and place the griddle on the grill surface. It’s incredibly easy to change modes with the Gravity series, and we didn’t find it to be troublesome over the many times that we went back and forth between cooks.

There are hooks conveniently located under the side shelf to hang the grill grates while the griddle is in use. We don't recommend using the hooks to hang the griddle, however. It *kind of* works, but the second you bump the grill the griddle will likely fall off. Don't ask us how we know.

Griddle:
The griddle surface is made of cold rolled steel, and it’s HEAVY. This isn’t a light and cheap griddle attachment that you might buy on Amazon for an existing gas grill. It’s made to fit the 800 series, and it locks into place and feels very secure when you’re cooking on it.
There’s a drain in the front left of the griddle top to allow for draining water during cleaning or other garbage that doesn’t need to stick with you for the duration of your cook.

There’s a handle attached to the griddle that allows you to pick it up and move it around without having to try and grip the cooking surface.
The sear that you can get on this griddle is exceptional. Not all griddles are designed to get to the high heat of the Masterbuilt Gravity Series 800, and this is where it shines. You can set the grill to 700 degrees, open the lid once you’ve achieved temperature and put a mean sear on burgers and steaks.


One of my favorite cooks on the 800 has to be the first time we did Smashburgers. We started with bacon and then added double patties and cheese with grilled onions, and the crust that was formed on the burgers was crispy and delicious. Simply an amazing way to make burgers with this grill.
Smoking:
When it comes to smoking on the 800, it’s a pretty simple process. Load the charcoal hopper full, but make sure that you’re placing chunks of your favorite smoking wood every 2” of coal or so. We love cherry wood around here, so we loaded up about 10 chunks of cherry with our full hopper of coal and the smoke was constant and consistent.

Charcoal hopper with lid open

Charcoal hopper
We also like to add a chunk or two of smoking wood to the ash bucket before we start a cook, and the hot ash that falls from the charcoal as its burning brings even more smoke to the party.

Charcoal grate

Ash bucket
The first thing we smoked was a chuck roast, and we put it straight on the grates at 275 for 4 hours. We liked the color that we had at the 4 hour mark, so we put it in a foil pan with some beef broth and covered it to braise the roast to finish. The roast shredded beautifully and have a great red smoke ring.
Next we fired up a rack of spare ribs for mom and dad when they visited. Cooking at 250, we wanted to see how the grill would do with the ribs unwrapped for the duration, and the slab finished at the 4.5 hour mark with the kind of crust that you can only get with charcoal as the source of fuel.
There have been other cooks as well, but if you want to see more of those you can always check us out on Instagram.
Storage
We store our Masterbuilt Gravity Series 800 outside under the optional cover. The cover is heavy duty, and well worth it in our opinion if you’re going to be bringing this unit home and planning to keep it outside.

The grill does plug into a typical AC outlet, so if you’re going to be moving the unit around, keep this in mind as it does tether you a bit to available power.
What We Loved
Countdown and Count-up timer- The controller has a timer that will count both ways, which is great if you’re someone who keeps cooking notes like me. I like to start the timer as soon as I put a piece of meat on the grill so I can make notes when I did specific things during a cook. How far into the cook did I wrap? At what points did I spritz or open the grill lid? How long did it take to hit a specific internal temperature? Not many grills have added this option, and we love that it’s a part of the Gravity Series.

Smoke/Sear Grates- We mentioned earlier that the grates are reversible, designed on one side for grilling and the other side for smoking. The smoking side resembles the top point of a triangle, making as little contact with the meat as possible and allowing smoke the opportunity to contact as much surface as possible. The grill side looks like the flat bottom side of a triangle, giving as much grate exposure as possible for those grill marks that most grillers crave.

Probe port on cooking chamber- I can’t tell you how many grills don’t have a probe port on the side of the cooking chamber, but I’m sure glad that Masterbuilt added this. It’s annoying to constantly have to shut probe wires for thermometers in the door when you’re cooking a larger piece of meat. It wears on the cables, and kinks and thermometer cables just aren’t a good match for longevity.

Foldable Front Shelf- I love that the front shelf is foldable. It’s deep enough that I can rest a pan on it while I’m working with food on the grill, and having it fold out of the way makes for a smaller footprint to walk around on the patio when it’s not in use.

Opportunities for Improvement
Solder connections on controller- A strange thing happened after the first cook on the 800 when I went to put it away. There’s a cable wrap on the back of the side shelf to tie the power cable around when you’re storing the grill. A nice addition, but after reading the entire manual before heading out for the first cook, I didn’t read anything about needing to disconnect the power cable before you wrapped it on the cable wrap. If you’re going to use this to store your cable, please disconnect the cable from the controller first.
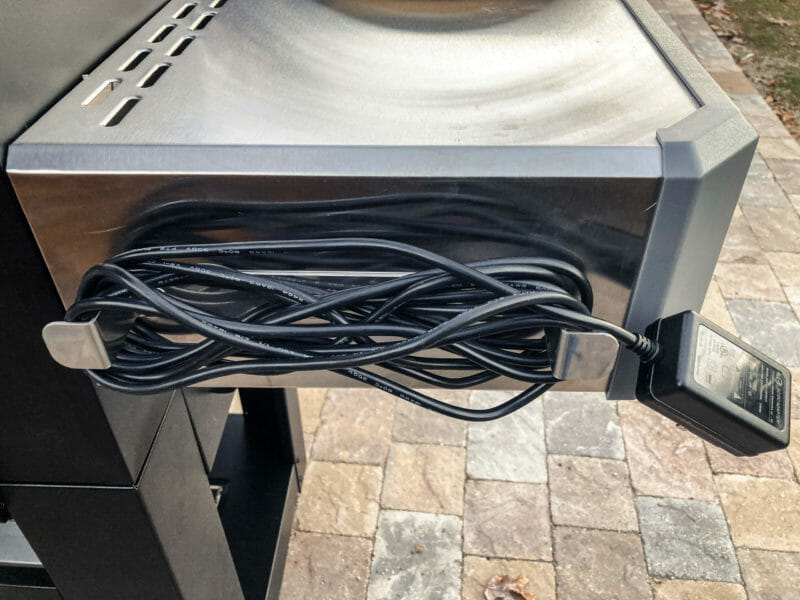
I just pulled the cable back and started winding it around the supports, put the grill away and didn’t think another thing of it. I went outside for an overnight brisket cook two days later, and the grill wouldn’t power on. I checked that the cable was plugged into power, checked that the cable was attached to the controller, all looked good, but no power. Tried multiple power outlets, still no power. It was like a cable was loose in the controller, so I pulled the controller out and took it apart. There it was. The solder joint that holds the power cable attachment to the motherboard had completely come off, separating the cable from the board.

I’m certain that this happened because I put the cable on the cable wrap after the first use, but really? Upon further inspection, the three cables that come out of the controller are crimped in between the front and back of the controller itself inside of a rubber oval. The power cable is in the middle of these three cables, and while the outside two cables hold strong in the rubber fitting, the power cable in the middle slides in and out with barely any resistance. If you’re interested in this grill, you’ll want to put some strain relief on the power cable connection at the controller.
Strain Relief on power cable- I believe that the power cable needs to have some strain relief instead of relying on a solder joint to hold the cable up. There are a couple of ways to do this. First would be to tie something around the power cable so that it can’t move far enough to put strain on the solder joint. Another way would be to attach a hook under the side shelf so that any strain is absorbed by the cable and not the solder joint. I’m not an engineer, so if you have an idea of how to better solve this feel free to comment below. Ya’ll are really ingenious, and I can’t wait to hear what you come up with.
Smoke leaking out top of charcoal hopper- The latches are set from the factory so that the top of the charcoal hopper will close relatively tightly, but we still had quite a bit of smoke leaking from the top of the hopper. We tightened the latches down considerably, and the lid was much tighter when closed, but we still had smoke leaking out of the top of the charcoal hopper for each cook that we did. Maybe smoke is supposed to leak from the top, but I thought that it needed to be a completely closed environment to stop the chimney effect. May not be anything serious, but something to keep an eye on. None of my cooks ended up with the hopper engulfed in flames, but we were nagged by smoke coming out of the top and wondered if it was supposed to be there or not.
Dent from the factory- Like we laid out above, the charcoal hopper arrived dented from the factory. I’m sure things like this happen and get through production on any unit that is mass produced, but it’s still something to note on areas that could be improved.

Black goo leaking from chimney seal that discolors patio- We had some liquid smoke? Black goo? Puddle of blackness? That formed at the bottom of the ash door and dripped on to our new outdoor patio that we weren’t happy about. I’m guessing it was a seal that wasn’t doing its job on the ash drawer access, but we have some cleaning to do and a grill mat to purchase for future cooks. The 800 found its way off the patio for future cooks until we could get a mat to make cleanup easier.
When using the app, grill will turn off for no reason- We had the grill turn itself off for no reason that we could figure out two times on two different cooks. Each time this happened, we were testing out the Masterbuilt app to check temperatures on both the grill and the meat we were cooking. It happened on the rib cook, and two hours into the cook, I walked out to see how things were going, and the controller screen was backlit blue, but there was nothing else on the screen and the fans were off. Second time was during the steak cook, as I was taking a screenshot of the app to show how hot the grill had gotten and how long it took, I walked out the door 5 minutes later with a steak and the screen was blue with no information on it and the grill was cooling down. After those two experiences, we just stuck to the “walk out and see for yourself” method instead of relying on the app. That’s a shame too, because the app is so freaking cool. From the smoke video background to the immediate updates to temperature and controllability, it’s a fantastic app. If it shuts down the grill though when you haven’t asked it to, it’s not as helpful as it could be.
Thickness of the metal- It’s almost impossible to meet the build quality that most of us consumers expect in a grill these days. Let’s be honest, most of us want a grill for under $500 that boasts ¼” metal thickness over the entirety of the grill. We also want the latest electronic controllers to make things set it and forget, and we want it to be able to live outside without a cover 24/7/365 and last 20 years. It’s an impossible task to meet those expectations at the sub-$1,000 mark, yet we complain all the more that the grill companies are skimping on quality and they’re ripping us off. Here’s the deal, for the price of this unit, I’m okay with the way they’ve built it. Is it a tank that will last 20 years? Probably not. It’s a charcoal grill made out of thinner sheet metal that can go up to 700 degrees Fahrenheit. The charcoal chute is double walled, which is fantastic, but it still has me wondering how long the grill can last.
Tips
Shaking the charcoal grate before lighting- The grate that the charcoal rests on at the bottom of the hopper should be shaken vigorously before you try to light any previously lit charcoal. You’ll want to knock off the ash so that the flame from your firestarter can light the coal instead of shield it from the fire. We forgot to shake the grate a couple of times, and it made getting things to light much, much harder. There are two metal strips that allow you to set your firestarter below the grate, and that’s the way to go to get a good light on this unit.

What lighters to use- There are so many different lighters that you can use when lighting charcoal, but for this purpose, we suggest going with flat, square lighter pucks like we use with our kamado. I used the Nitro firestarters from Grill Dome for each cook, and they were the perfect size for lighting up the Gravity series. I have Weber lighter cubes and Royal Oak tumbleweeds on hand, but they’re too tall to fit where the lighters need to go, so the flatter the better when it comes to getting this pit lit.
How to store the grill grates/griddle- There are two small hooks on the side of the 800 series located underneath the side shelf. You can store the grill grates here when you’re using the griddle, but we have yet to figure out how to store the griddle here when using the grill grates.

How to store the power cable- We suggest that you disconnect the power cable from the controller whenever you would like to wrap the power cable on the provided cable mount system on the back of the side shelf. If you don’t disconnect from the controller, there’s a possibility that you’ll pull the wire right off the controller circuit board and your controller won’t be able to get power without breaking out the soldering iron and re-attaching it.

Wood chunks in the charcoal hopper- One of the things that Adam taught us when we were first introduced to the Masterbuilt Gravity Series was to add wood chunks right into the charcoal hopper whenever you’re needing to add fuel. It’s recommended that you make sure to not exceed 10-15% of the hopper with wood so that charcoal is still the primary source of fuel and the controller can keep a consistent temperature. We like to add in 1 large chunk of wood every 2-3 inches of charcoal, and it keeps the smoke rolling.
Wood chunks in the ash pan- If adding wood chunks into the charcoal hopper doesn’t give you enough smoke, then adding a few chunks of smoker wood to the ash bucket will give you more. As the charcoal disintegrates during the burn, the hot ash will fall on to the smoking wood and bring more smoke to your cook.
Lump vs. Briquettes- The Gravity Series can run on both lump and briquettes, but we find that we use briquettes most of the time. We found that the briquettes gave us a more consistent burn and allowed us to cook longer without needing to reload the hopper.
Conclusion

The Gravity Series from Masterbuilt is a strong addition to the outdoor cooking market. They’re bringing technology what was previously only available to competition bbq cooks to the hobbyist’s backyard.
While the Gravity Series does have its drawbacks, we find that the pros outweigh the cons and make this a solid option for anyone who likes to smoke and grill.
The Masterbuilt Gravity Series 800 model combines the set it and forget it ease-of-use that we’re used to in a pellet grill with the flavor and high heat of charcoal.
With smoking, grilling and griddling as options on the 800 series, it’s hard to find another unit on the market right now that’s as versatile a machine in such a compact footprint.




Jeanne
March 5, 2021 8:23 pmThank you for this excellent and helpful review on the Masterbuilt 800. I have been debating about getting one. I found this article very helpful. Two things thing I would have liked more information on is the internal size capacity of the grill and how to use a the griddle. The tips, though, were very helpful.
Thanks again!
Jeanne
Mark Kraus
January 18, 2024 3:35 pmI have had the Gravity 800 for 9 months and was loving it until my controller went out. Now it doesn’t work. Masterbuilt does not have a call in support everything is done online and it’s a difficult process to navigate a warranty claim. Once I was finally able to submit the claim they cannot tell you how long it will take to deliver the parts. All they can tell you is parts are on back order and they don’t know how long it will take to get in. Very frustrating and when I looked up reviews on Google there were instances where customers have been waiting for months. Because of their lack of service capabilities I would discourage anyone to buy from Masterbuilt.
This is too bad because I really liked the grill but I think their service is very questionable and unacceptable.
Hezekiah Barnes
March 8, 2021 5:53 pmThe griddle has holes along the inside of the angle bar used to reinforce it, those line up with the hooks. I hook with front of griddle toward the back, hook it first then hook the back on the front hook.
John Crawford
April 13, 2021 6:34 pmJust wondering about at the end of the cook how do you control or “turn off the grill” ? also refilling the charcoal during cooking.
Matt
June 14, 2021 4:27 amThanks for the tipoff in the power cord not having strain relief. I used some Sugru and was able to make my own strain relief at the outlet point of the three cables coming out of the controller unit 🙂 Hope it holds up!
JAY LEACH
August 10, 2022 7:53 amPUT THE PLATE BACK BETWEEN THE HOPPER AND GRILL. IT’S AIRTIGHT AND THE COAL WILL GO OUT TO REUSE THEM
paul siegel
July 24, 2021 11:21 pmAre the electronic timer, fan and thermometer covered under warrantee?
David Gafford
July 27, 2021 5:38 pmIt is my understanding that those parts would be covered by the warranty.
Mark D.
November 3, 2021 5:07 pmAfter a cook, can you close off the hopper so that the charcoal goes out, then re-light it for the next cook?
David Gafford
November 3, 2021 5:38 pmYes, that’s the beauty of this type of cooker!
Brent Siebenaler
April 4, 2022 7:53 pmIs there a way to empty the hopper to go from straight charcoal for just grilling to adding wood chunks, or a different type of wood, when going from grilling to smoking?
David Gafford
April 6, 2022 8:02 pmI’m not aware of an easy way to empty out the hopper on this grill. I find that I just add wood chunks in whenever I’m filling the hopper, and I enjoy some extra wood flavor whether i’m smoking or grilling. After a couple of uses, I got a handle on how much charcoal I’d need for a particular cook at a certain temperature. Now, I just fill the hopper with what I think i’ll need for a cook plus 20%, and I don’t have a huge backup of charcoal for what’s next since I may not know what cooking is coming up.
Jason
April 5, 2022 9:05 pmI’m highly considering this unit but wasn’t sure of the flavor one achieves with a typical Weber charcoal grill compared to this? The crisp outer skin on chicken thighs with the flavor is something I’d be strongly disappointed in if I spent this much money to not have the same flavor profile. Same with searing on a tomahawk pork chop.
Can you confirm the flavor profiles/ charcoal achieved flavor is the same or better with this grill?
Thanks!
David Gafford
April 6, 2022 8:08 pmI can’t confirm that the flavor profile is the same on this grill as what you’d get on a Weber charcoal grill. The main reason is that I don’t know how you cook with your Weber. Are you setting up two zone cooking with a hot side and a cold side? Are you working with the Snake technique or cooking straight over the coals? Each of those methods will have their own flavor profile since some are indirect, some are direct, some have greater airflow, etc. What I will say about the Masterbuilt Gravity Series is that I’m super happy with it. The sear capability and the smoke performance are both great for me, and I cooked on over 30 different cookers last year alone. The biggest difference I think you’ll find between this cooker and a Weber kettle is that the kettle allows you to drop meat juices straight on to the coals and this unit does not since the coals aren’t under the food. Juices can still drip on the metal diverter below, which will evaporate them into steam, but it’s not juice hitting charcoal. That’s not possible on this grill, so it’s not the exact same cooking process as a Weber kettle, and therefore I can’t guarantee that it’ll taste the same to you.
i.w
April 28, 2022 10:46 pmThe back of the griddle has a bar in the middle with two more bars on the sides. These side bars have holes. This is where the hooks underneath the controller hold the griddle properly so it wont fall when the grill is bumped. You hang the griddle vertically instead of horizontally, with the cooking surface facing outwards. Best way to light the grill is just an oil soaked paper towel. I just put a paper towel or two in, spray with cooking oil, and light. Works perfectly every time.
Patrick
May 2, 2022 9:36 pmI’ve seen other places on the web say that you cannot use this grill in the rain. I’m considering the 800 series but I would want to be able to store it outside in MN all the time and be able to use it in the winter as well as our wet seasons. I’m okay putting a cover over it when not in use but if it won’t hold up to being stored outside I’m not sure this is the grill for me. Any thoughts or words of advice?
David Gafford
May 3, 2022 6:02 pmWe’ve had this grill stored outside under a cover for about a year and a half now, and it’s holding up just fine. There’s some surface rust on the diverter components and the griddle, but I totally expect that. It’s all unpainted iron that’s in the elements, and it’s going to rust. I just heat it up, oil it down and give it a good scrub and we’re back in business. I haven’t heard that you can’t use it in the rain. That’s news to me. We have a pavilion here in the outdoor kitchen, so if it rains we just wheel it under the roof until the storm blows over and keep on cooking, so I can’t speak to that. It has been cooking when it started raining, and left in the rain for 20-30 minutes while it rained and kept on going. I’m not sure why it wouldn’t work, but that’s out of my expertise there.
Jimmy Kirk
August 3, 2022 4:05 amI was wondering something similar. Will it continue to work if the fuel gets wet in the rain? My pellet grill does fine, because the hopper is enclosed where water cannot get in. It looks like the charcoal hopper of the Masterbuilt 800 has mesh perforations (I assume to prevent the chimney effect) but wouldn’t that allow rainwater to enter? I don’t have any kind of pavilion.
David Gafford
August 3, 2022 12:54 pmGreat question Jimmy. The hopper of the Masterbuilt 800 does have mesh perforations, but that’s just on the external metal cladding that surrounds the charcoal hopper. That’s the mesh that keeps us from being able to touch the hot hopper, which is fully enclosed and waterproof. There’s a seal around the top of the hopper that makes sure the fuel can’t get wet, and more importantly keeps air from being able to get in so there’s no the chimney effect. I kept the Masterbuilt 800 on the patio for over a year under the factory cover, and it was fine.
Andy
May 3, 2022 5:52 pmDavid,
If you still have this grill, how have the components held up? I am trying to decide between this unit and a Victory pellet grill and like the greater versatility of this unit.
Thank you
Andy
David Gafford
May 3, 2022 6:06 pmHi Andy, I cooked on this unit 3 days ago, and the chicken was fantastic. Like I just mentioned in Patrick’s question, it’s been holding up pretty well. Surface rust on the griddle and diverter pieces, but unpainted metal will rust, even under a cover. I just heat it up, coat it in oil, scrub it down and keep on cooking. Haven’t had any trouble with any of the painted surfaces rusting in 18 months, and the firebox is holding solid. It’s not a grill that’s built for a decade of service in my opinion, and I’ll be happy to get 5 years out of it before it starts to show some real wear from cooking at 700 degrees. Haven’t had any experience with a Victory pellet grill, so can’t be of much help there. All the best!
Nicholas
June 11, 2022 2:28 amI am interested in 3 grills but can only afford one for now,
If you had to choose 1 grill how would you rate this against the KC combo and the vision komado?
best regards and great reviews,
Nicholas
David Gafford
June 13, 2022 12:30 amBetween those three options, I would choose the Masterbuilt Gravity 800.
Tony Langlois
November 24, 2022 3:46 pmHas anyone else had their fire box burn out or disintegrate? I’ve only had it six months it works awesome cooks amazing use it once sometimes twice a week . I want to find out how to fix or get it warrantied
David Gafford
November 28, 2022 5:50 pmI haven’t had any issues with the firebox yet, but if you’re 6 months in and have an issue, I’d for sure contact Masterbuilt customer support and work it out with them. I know that’s not the experience they want for you, and i’m sure they’ll work to make things right.
John
February 17, 2023 11:04 pmI’m 25 foot from the outlet where i want to put this grill What gauge of extension cord will i need ?
David Gafford
February 21, 2023 8:57 pmAny outdoor extension cord should work fine.
Steve
June 19, 2023 7:43 pmI currently have a kamado joe big joe, absolutely have loved it. However, ive been looking at Pitboss ultimate griddle (ceramic coating ) and Blackstone griddle. Looks like this would season the griddle in the same way. Is there anything extra to compare between the griddles. I’m sure the smoker would be comparable to kamado. Love to hear if you have any extra to consider on my purchase.
Michael MCCANN
August 13, 2023 10:42 pmGrill is a fail. Concept is brilliant but if you’ve used it for any amount of time, it’s just not worth the frustration. MB has been prompt with the support and shipping replacement parts on their dime but it’s one problem after another with this thing. 2-300 degree temp swings are unacceptable for the price.
Max Richards
February 9, 2024 11:38 pmI bought masterbuilt 800 about 3 months ago and was really happy at first. Now Im having troubles gettilng to lite and build heat ! I cleaned it about every time it was used so I cleaned out the coal and discovered the bottom part is all burnt up. How do I talk to some one on the phone. For the money we paid it should be better !!!!!!!!
David Gafford
February 12, 2024 2:12 pmOh man, I’m sorry to hear that. Definitely give Masterbuilt customer service a call. https://www.masterbuilt.com/pages/customer-support
Jeremy
April 26, 2024 4:58 pmHow does everyone keep the ash from the grilling area. I have experienced excessive ash and do not wont to collect on the food.
I have been searching the internet for solutions, but have not found any. I am not the only one with this issue since I found others mention it. I just haven’t come across any solutions.
David Stewart
July 2, 2024 10:55 amI have never experienced customer service that does not exist. Worst purchase of my life! Controller stopped working on the gravity series 800 shortly after purchase. Then I find out there is no replacement available with WIFI! I will continue to give poor reviews!