
Buttermilk pancakes are a breakfast staple loved by many, and what better way to elevate this classic dish than by taking it outdoors? In this article, we’ll delve into a delightful buttermilk pancake recipe that’s not only easy to whip up but also perfect for cooking on an outdoor griddle.
Whether you’re a seasoned outdoor cooking enthusiast or a novice looking to expand your culinary horizons, these buttermilk pancakes will become a breakfast favorite. Get ready to sizzle up a stack of golden perfection with this scrumptious recipe.
The Outdoor Griddle Advantage:

Cooking buttermilk pancakes on an outdoor griddle adds a layer of excitement to your breakfast routine. The griddle’s large cooking surface allows you to prepare multiple pancakes simultaneously, ensuring that everyone gets a hot and fresh stack.
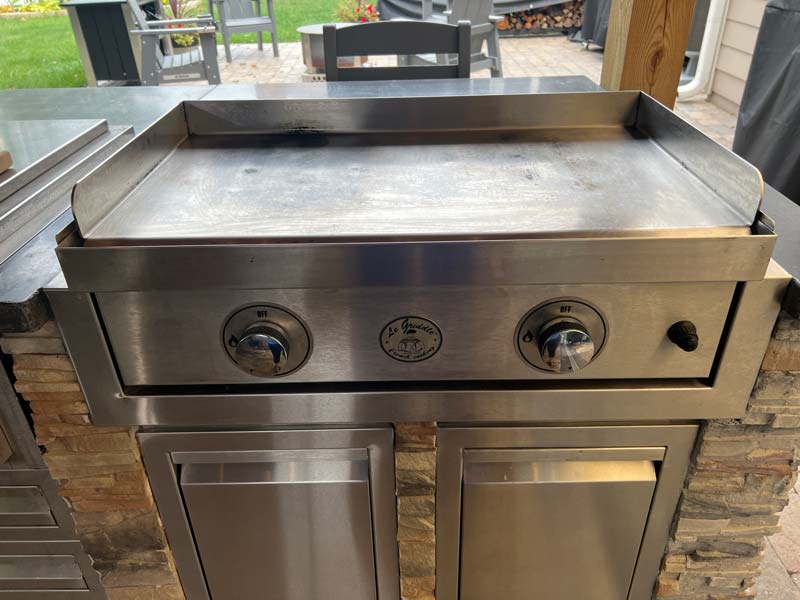
We love to use our Le Griddle stainless steel griddle that we built into our outdoor kitchen a couple of years ago whenever we are ready to cook up a bunch of buttermilk pancakes. There’s so much cooking space that we can cook pancakes by the large batch in no time.
Before you fire up the griddle, let’s break down the steps to create these mouthwatering buttermilk pancakes.
Our Buttermilk Pancake Recipe
Ingredients:
- 1-1/4 cups all-purpose flour
- 1/4 cup granulated sugar
- 1 heaping teaspoon baking powder
- 1 teaspoon baking soda
- 1 pinch of salt
- 1/4 cup cooking oil
- 1 large egg
- 1-1/4 cups buttermilk
Step-by-Step Guide:
- Gather Your Ingredients: Before you start cooking, ensure you have all the ingredients measured and ready to go. This preparation step helps streamline the cooking process and prevents any last-minute scrambling for missing elements.
- Preheat the Outdoor Griddle: Place your outdoor griddle over the heat source, whether it’s a gas grill, charcoal grill, or dedicated griddle station. Preheat to medium heat, allowing the surface to get hot but not scorching.
- Create the Pancake Batter: In a large mixing bowl, combine the flour, sugar, baking powder, baking soda, and a pinch of salt. Whisk the dry ingredients together to ensure an even distribution.
- Add the Wet Ingredients: Crack the egg into the bowl and pour in the buttermilk and cooking oil. Using a whisk or a spoon, gently combine the wet and dry ingredients until just mixed. Don’t overmix; a few lumps are perfectly fine and contribute to fluffy buttermilk pancakes.
- Let the Batter Rest: Allow the batter to rest for a few minutes. This brief pause lets the baking powder and baking soda work their magic, resulting in light and airy pancakes.
- Oil the Griddle: Before pouring the batter, lightly oil the griddle surface to prevent sticking. You can use a paper towel or a brush to apply the oil evenly.
- Perfectly Portion the Pancakes: Use a ladle or measuring cup to pour uniform portions of batter onto the hot griddle. This ensures consistent cooking times and perfectly shaped buttermilk pancakes.
- Watch for Bubbles: As the pancakes cook, keep an eye out for bubbles forming on the surface. Once bubbles appear and the edges look set, it’s time to flip.
- Flip with Care: Using a spatula, carefully flip each pancake. The flipped side should be golden brown. Cook for an additional minute or until both sides are beautifully golden.
- Stack and Serve: Transfer the cooked buttermilk pancakes to a plate, stacking them high for that classic presentation. Serve with your favorite toppings—maple syrup, fresh berries, or a dollop of whipped cream.

Tips for Pancake Perfection
Temperature Matters.
Finding the right griddle temperature is key to achieving the perfect pancake. Too hot, and they’ll brown too quickly; too cool, and they may turn out pale and undercooked. Experiment with your outdoor griddle’s heat settings to find the sweet spot.
Fresh Ingredients Shine.
Using fresh buttermilk and eggs enhances the flavor and texture of your pancakes. Don’t shy away from quality ingredients; they make a noticeable difference.
Don’t Overmix.
Overmixing the batter can lead to dense buttermilk pancakes. Stir until the ingredients are just combined, and embrace a few lumps for that extra fluffiness.
Experiment with Toppings.
While these buttermilk pancakes are delicious on their own, feel free to get creative with toppings. From classic maple syrup to nut butter, sliced fruits, or even a dusting of powdered sugar, there’s no limit to your pancake artistry.
Preserving Leftover Buttermilk Pancakes
Since buttermilk isn’t an ingredient we tend to keep on hand at all times, we make the most of it when we buy it. We will generally make as many batches of this buttermilk pancake recipe as our supply will allow, and then freeze our leftover pancakes in gallon-size freezer bags or a plastic container.

Then on busy school mornings, we simply pull out the few buttermilk pancakes needed for that day and pop them in the toaster for a couple of minutes. My personal favorite is to then spread peanut butter on them but our kids usually go for Nutella or traditional maple syrup.
You can also reheat leftover pancakes in the microwave for a softer, more-moist-than-toasted texture.
Homemade Buttermilk Pancakes
Ingredients
- 1¼ cup all-purpose flour
- ¼ cup granulated sugar
- 1 tsp baking powder heaping
- 1 tsp baking soda
- 1 pinch salt
- 1¼ cup buttermilk
- ¼ cup vegetable oil
- 1 large egg
Instructions
- Preheat your griddle to medium heat.
- Measure dry ingredients into a mixing bowl and blend together with a whisk.
- Add wet ingredients to dry ingredients and mix gently until fully blended.
- Allow the batter to sit for a few minutes to provide time for the baking powder and baking soda to add bubbles to the batter for optimal fluffy buttermilk pancakes.
- Lightly oil the griddle surface to prevent pancakes from sticking
- Use a 1/4 cup measuring cup or pancake batter dispenser to portion the batter out on the griddle.
- Once the edges of the buttermilk pancakes begin to pull up from the griddle surface they are probably ready to flip to the second side.
- Allow the buttermilk pancakes to cook for about another minute on the second side and then remove from the griddle and serve.


Matthew Novet
March 1, 2025 12:24 pmWhat brand of batter dispenser are you using?
David Gafford
March 2, 2025 2:45 pmHere’s a link to the dispenser we were using: https://amzn.to/43hG4Qs